First Impressions: Ay Up Lights
We got the Ay Up lights MTB Kit to test this last week right before leaving for Sea Otter and I’m going out on my first night ride with them tonight. But before that, I though I’d post up a couple of pictures for you and discuss what we’ve got here.
The Ay Up system at first glance can be a bit overwhelming, at least that was the case for me. I’m not going to sugarcoat it. When I originally went on their website to take a look at their stuff I immediately felt overwhelmed by the choices, the batteries, the lights, the harnesses, the chargers, the mounting pieces… After a few minutes I got off their website and thought to myself that this may not have been such a good idea.

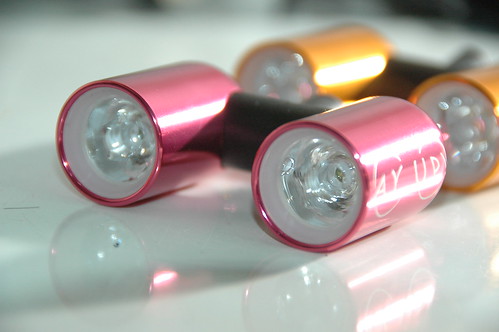
I’m secure enough in my masculinity to rock the pink & gold, as long as its not cardinal/gold, eck.
What it really took was just some time to digest what I had seen. After a few minutes I went back on their website and was able to better process what Ay Up was offering. It helps that I found the MTB Kit, too. I proved that I understood what was going on when I pulled out the Ay Up system last night and put together the helmet and handlebar mounts. Yeah, Ay Up’s MTB Kit comes with mounts and lights for both the handlebar and helmet.

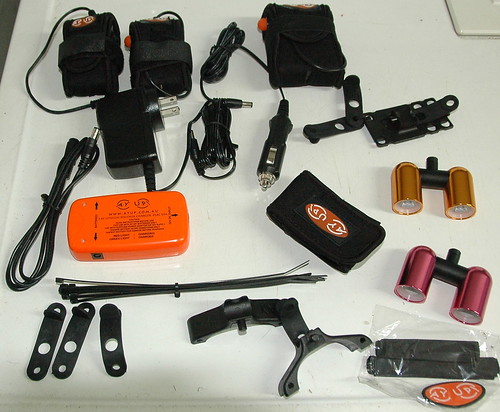
Here’s the whole shebang… a little overwhelming, but stick with it for a minute or two and you’ll get it. Here’s some help: batteries across the top (2×3-hour + 1×6-hour), chargers on the 2nd row, below the zip ties are the mounts (extra mounts too), on the right are the lights
First Impressions:
Once you get past the abundance of parts, it all makes sense. In fact it only took a few minutes to put everything together although I would highly recommend purchasing a few more zip ties. I didn’t read the directions and wasted a few of them. Thankfully the kit came with enough zip ties to get everything mounted. I’ll need some more though to mount the 2nd handlebar mount to my other bike.

Helmet mount uses zip ties. Brilliant! Simple, cheap & strong… pick all three. 3-hour battery mounted with velcro strap.
These lights are LIGHT weight. After I strapped everything onto my helmet, I picked up the helmet expecting to feel like I put a brick on there. No such brick. I could feel that there was extra weight on the helmet but it was not heavy. In fact I’d say that it was still comfortable and barely noticeable once strapped onto my head.
After a quick spin around the neighborhood, I feel that this setup has good potential. They Ay Up lights on my helmet have a tighter beam while the handlebar lights have a slightly wider light pattern. We’ll see how it plays out tonight.
Charging was a breeze with the smart charger. Plug them in and a red light turns on for each battery. When the battery is done, a green light appears. Unplug and you’re done.

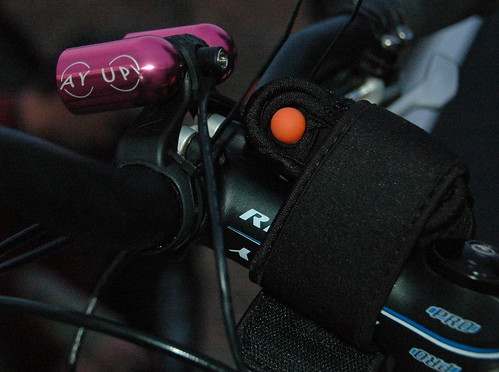
Battery pack mounted directly behind the lights on the stem
I’ll be spending the next few months reviewing the Ay Up lights. Check back for an update after a couple of night rides and the full on review after that.
For Ay Up lights website click here.


Ay Up Lights are UNBELIEVABLE!!! I have been using Ay Up lights for about one year now and I WILL NOT use any other light system! Andrew’s customer service is second to none and the product quality is impeccable!! I have used them in one 24 hour race and all winter here in the Pacific Northwest (Tacoma) during our local weekly night rides. Even my friends and fellow riders have tossed their HIDs in favor of the lightweight, compact, tough, and super easy to use Ay Up light system. I keep my helmet light on my helmet 24/7 now since it is so lightweight and convenient I barely notice it’s presence until I need it after a longer than expected ride in the evening and then the Ay Up lights are so bright I never have to worry about finding my way or running out of battery power!!
I would HIGHLY recommend Ay Up lights to anyone looking for a kick ass LED riding light system!! For the same retail price (or close to it http://www.rei.com/product/760295 ) of the niterider tri-newt you can get Ay Ups endurance kit with TWO lights, 6 SIX!! batteries totaling 24 hours of battery burn time, mounts helmet and bars, charger with car adapter!, and a nice neat neoprene case to store every thing!!! Enduro kit http://www.ayup.com.au/kits.php
B
So you like the lights too eh? My buddy, whom I was riding with last night, could not get over the size & light output of the Ay Up. I couldn’t believe they didn’t heat up. It’s going to be fun testing these lights.
I am SO jealous…time to save up my pennies!