Skip to content
-
Subscribe to our newsletter & never miss our best posts. Subscribe Now!
MtnBikeRiders.com

Just an old mountain biking site

MtnBikeRiders.com

Just an old mountain biking site

  • Home
  • Contact US
  • FTC Disclaimer
  • Guest Posts
  • OFFICIAL RACE TEAM
  • Store
    • Cart
    • Checkout
    • Clear
    • IPN
    • Receipt
  • About MtnBikeRiders.com
  • Home
  • Contact US
  • FTC Disclaimer
  • Guest Posts
  • OFFICIAL RACE TEAM
  • Store
    • Cart
    • Checkout
    • Clear
    • IPN
    • Receipt
  • About MtnBikeRiders.com
Close

Search

  • https://www.facebook.com/
  • https://twitter.com/
  • https://t.me/
  • https://www.instagram.com/
  • https://youtube.com/
Subscribe
ArticlesHow To's/Tech TipsMainMountain BikingProducts

Bike Handlebar Camera Mount

By Jeremy Yang
September 9, 2008 2 Min Read
4

All new bikes come with reflectors in the spokes of the wheel, on the handlebar and on the seatpost. Most people take off the reflectors and toss them thinking that they’ll never use this functional piece of plastic again but I think there is a lot of life yet to be extracted from the these safety parts.

Previously, I have found that the reflector holder can be easily converted into a cheap inside chain guide. I’ve used the plastic holder as an inside chain guide for the past 9 months and it has done an excellent job of keeping my chain on the front ring. In fact, over that period of time, I’ve only thrown the chain twice!
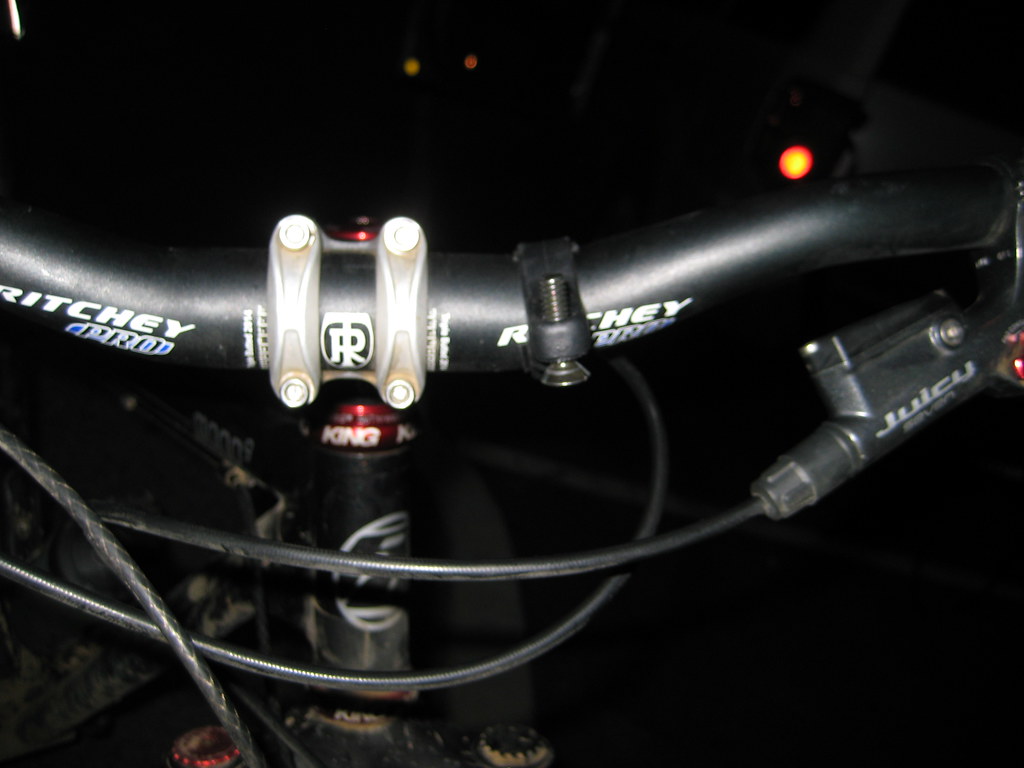

Sorry, I didn’t think to bring a 2nd camera to take a picture of the 1st camera mounted on the holder. Doh!

Another use for the useful reflector holder is as a handlebar camera mount. I found one reflector holder in my parts bin and attached it to the handlebar via the screw it came with. Then I found a 1/4” threaded screw and I forcefully threaded this screw into the front of the reflector holder. The reflector holder normally has two holes, but neither hole is meant for a 1/4″ screw. No worries though, it’s just plastic.

Mount the camera on and now you’re ready for video. A couple of quick lessons learned:
– mount as close to the middle of the handlebar as possible especially when using oversized bars. In the picture above I realized that the horizon was not going to be level after I installed the camera while on trail… without the proper tools to move it over to the middle.
– make sure to screw things down firmly. You don’t want to lose your camera when going down the rough stuff
– which takes me to my last lesson: this works better when you’re going slower, especially if the going is rough. When you’re going too fast the camera just tends to rattle around too much.

Related posts:

  1. Flat Free Tire Sealant: Tested
  2. Purchasing Decisions
  3. 2008 versus 2009?
  4. Review: Domino Men’s Mountain Bike Shorts

Tags:

camerahandlebarreflector holder
Author

Jeremy Yang

Follow Me
Other Articles
Previous

Why one speed? Ten things to think about

Next

First Impressions: Flip Video Mino

4 Comments
  1. Joe S. says:
    September 9, 2008 at 11:43 am

    Cool idea Jeremy. I actaully made one of these before. I had an extra GPS handlebar mount and I took off one the screw (from the shoe) of a tripod. It worked great however the compact camera I used was too heavy where the mount eventually broke.

  2. RL says:
    September 9, 2008 at 11:48 am

    Moe had a “stem cam” that we used for a bit. The only problem with it was the amount of jarring movement.

  3. Ghost Rider says:
    September 9, 2008 at 5:03 pm

    Pretty damn handy, Jeremy — I’ve got a sack full of those mounts — I’ll have to try this trick!

    Moe turned me onto the “stem cam” mount…the Pedco Ultraclamp, and it eliminated that “cocking” effect of mounting the camera directly to the handlebar. Because it has a ball pivot, I can level the camera to get a nice clear shot.

    As for jarring, I’m not sure there’s anything out there that can isolate the camera from road or offroad vibrations, short of a “steadycam” setup.

  4. RL Policar says:
    September 9, 2008 at 9:39 pm

    Helmet cams are the best things to get rid of the bouncing.

Leave a Reply

Your email address will not be published. Required fields are marked *

Links

  • Cock Coffee

Archives

Recent Comments

  • Fabricio Delfino on Review: KHS DH200 Downhill bike
  • Craig Cuttone on REDLINE’S NEW D880 & D860 and Hardtail D680 29er’s
  • JML on Product Review: Mighty Mendit
  • Hardtail Mountain Bikes: Exploring the Pros, Cons, and Best Use Cases on Full suspension or Hardtail? Pros and cons
  • Ray Johnathan on Nulksen Tire Inflator Portable Air Compressor first impressions

Links

  • Cock Coffee

Categories

  • 29er
  • All- Mountain
  • Articles
  • California Mountain Bike Directory
  • Company Profiles
  • Downhill
  • ENDURO
  • Events
  • How To's/Tech Tips
  • Humor
  • Injurded Rider
  • Interbike 2007
  • Interbike 2008
  • Interbike 2009
  • Interbike 2010
  • Interbike 2011
  • Interbike 2012
  • Interbike 2013
  • Interbike 2015
  • Interbike 2017
  • Main
  • Mountain Biking
  • News
  • Nonsense
  • Off Topic
  • Products
  • Projects
  • Reviews
  • Ride Reports
  • Safety
  • Screen
  • Sea Otter 2007
  • Sea Otter 2008
  • Sea Otter 2009
  • Sea Otter 2011
  • Sea Otter 2015
  • Sea Otter 2017
  • Single speed
  • Team MtnBikeRiders.com
  • WTF
Copyright 2026 — MtnBikeRiders.com. All rights reserved. Blogsy WordPress Theme