

In this article, we’ll be talking about a DIY method of making your own bicycle tire chains was not as hard as I thought it would be. I went to a local hardware store and picked up a few things I needed for this project. It turned out to be fairly inexpensive.
Things I picked up were:
15″ of braided chain $7.20
15″ of 1/16 uncoated cable (picture frame wire) $3.15
3 packs of 1/16 cable ferrule (used to bind wire together) $.78 a pack
A whopping grand total of $13.66 tax included.
Tools needed: needle nose pliers, wire stripper, wire cutter, and zip ties.
First, let some air out of your tires.
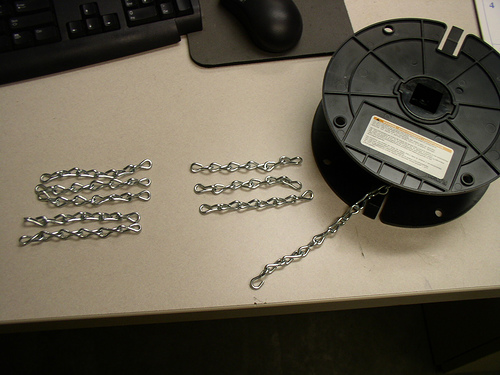
Then split the chain links into 6 links a strand.
Place the first strand of links on the tire and secure with a zip tie. Subsequent strands are spaced evenly with a 6 link strand.
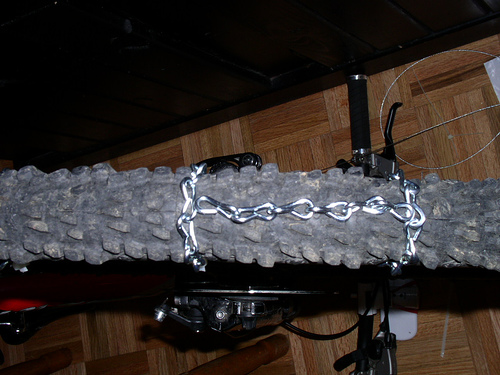
Once the chain links are in place, route the cable through the end links and secure with cable ferrule.
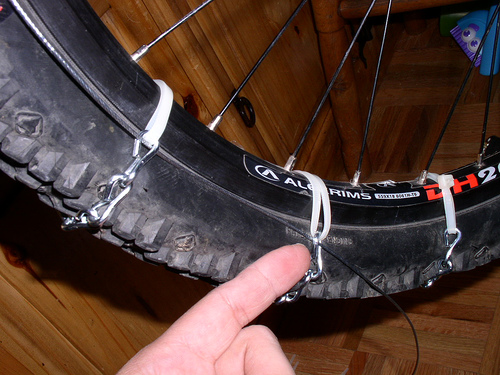
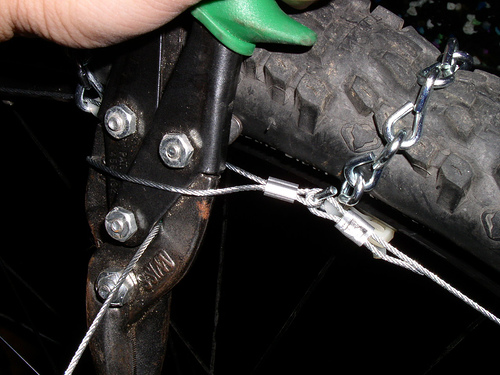
Ensure the cable is taut. I wrapped the cable around the wire cutter and pulled to get leverage.
Finished product. I left the zip ties in place to ensure the chains would not move.
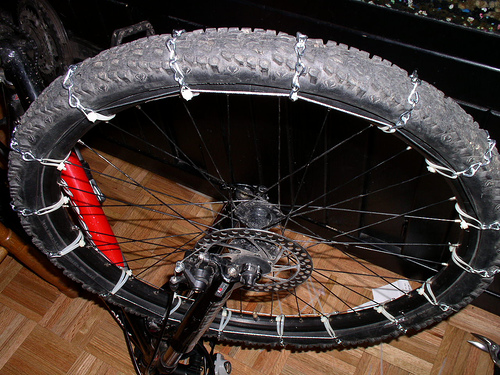
Lastly, inflate tires for normal use.


-
-
-
-
-
-
-
-
-
-
-
-
-
-
-
-
-
-
-
-
-
-
-
-
-
-
-
-
-
-
-
-
-
-
-
Show CommentsYou can also stud tires. Lots of fun with some friends and a lot of beer:
http://legoandy.com/Words/2005/12/15/acronychal-studding
Hmmm…
Once the tire is inflated aren’t the chains then below the surface of the tire resulting in less tyre touching the trail?
Kind of like tying string around a long balloon and ending up with a string of sausages?
Just checking before I make this.
Nice design but, what if you need to change a flat? A lot of work to redo on a frosty trail. I think studding an old pair of tires is little bit better for this.
What’s the advantage of these vs knoby tires?
Tire chains for cars/trucks make sense because it’s easier to put them on/off than to change tires.
Interesting. I’ve seen a comment that it won’t work w/o disc type brake.
I used to ice race motorcycles. We used sheet metal screws. They were screwed into the tire with the head sticking out. We put an old tire w/ the sidewalls off inside the regular tire so we could use longer screws.
I’ve used sheet metal screws on my bicycle. I used a grinder to shorten them so they wouldn’t go all the way through the tire.
They worked pretty well. You need to get the spacing right so you don’t skid the screw on pavement or rubber on ice 🙂
This will only work with disc brakes, but most people who are going to bike enough in the winter will probably have a good enough bike to have disc brakes
I haven’t run homebrew or commercial chains myself, but I remember seeing chains for sale either before disc brakes were available on bikes, or at least well before they were mainstream, so I think they are possible.
You may need to be careful and make sure the ziptie heads aren’t going to hit your brake pad, but I’m guessing many bikes will have the brake clearance to run these.
I just may give this a try!
I guess, i’ll be using my boots to stop front wheel of the bike. Unless my bike has disc brakes…
In Colorado, we used to do something like this.
Our technique is different, but not as clean and neat as yours. Let the air out of the tire, take the same type of chain, wrap it around the tire in a long coil (DNA style). Then wire the two ends together. Do this on the back tire for traction. Remove the back brake pads, so you do not forget and clamp on the brakes. Reinflate the tire, but leave it low, like for sand.
Leave the front wheel unchained, for braking and floating over the snow.
Lately, I have been using the nut and bolt technique. Put these in an old worn out tire. Once installed, line the inside of the tire with a few layers of duct tape to stop tube chafe.
Ride on Regardless.
I’d like to see the first, trying this with a rim brake 🙂
Another simple option is take a piece of rope and wrap/spiral around the rim and tire. This will only work with disc breaks or just put it on the rear wheel with no brake. Works well for snow not so well for ice.
Epic Fail! If you are riding in winter you must be serious about biking and a good pair of studded tires are worth the 4 month (or 6 here in Canada). Theses DIY tire things are dangerous and end up costing more in time. Work a couple hours of overtime and pick up the real thing. Unless you are just trying to prove to everyone how clever you are. Or you just want to hurt people and wreck their bikes.
I go to college in Wisconsin. That means it is really cold and it snows, alot. I use an adult tricycle to get around to my classes because of the basket in the back. Being a music major I always am toting around lots of crap (trumpets, backpack, music bag, whatever instrument i am learning in tech class, etc).
The tricycle is already better in snow than more bikes i’ve seen, but i want to make it better. I’m going to try it with zip ties on the back two tires (similar to wheelchair ones) and without zips on the front (mountain bike tire with scissor brake). I’ll let ya know how it works.
I don’t have disc breaks, but I’m fixed, so the hand break isn’t much help in the winter anyways.
any idea how I can fit something similar to a bike without disk brakes?
For the chains I made for my bike (I have the pad type brakes), I used all chain. First I calculated the approx circumfrence at a point where the chain on either side of the tire above the brake pads for clearance. Then I figured out the length of chain I would need across the tread part of the tire to connect the two sides of chain. Then I laid the long pieces of chain parallel on the floor and connected them with the short pieces that go across the tire at two inch intervals. So I have about 40 chain strips for traction total. I used #10 chain, so it is relatively light and easy to unbend and rebend the links to connect. I also marked one point as my “break point” so I can easily take the chains off and put back on with just a small needle nose if needed. Anyway, chains and low air pressure give me amazing traction for winter off-road.
I run a similar setup to todd’s on my bike. I also have the pad type brakes. With some work, you can make leave you rim clear for pad type brakes. I’ve made a set for both tires. It works great. Mine are spaced about every 3-4″.
Good answer, I am looking for the solution of the same question. Find the movies or mp3 you are looking for at rapidshare-provider.com the most comprehensive source for free-to-try files downloads on the Web
I think if you are comparing car tire chains to bike tire chains, Randy did a pretty decent job. I think the point was he was trying his chains out- he isnt selling them and potentially putting people at risk. (So take a breather, Oliver.) Exploring options for achieving better traction in the snow and ice is always a good thing- look at the ideas he got out of people above. Some of the best ideas come out of initiatives that don’t always work out the first time. (Not this his chains won’t.)
I took a lot of inspiration from your design when I made my set: http://wvcycling.wordpress.com/2010/01/04/snow-tire-chain-bike/
I’m wondering how these would work for wheelchair tires… I’ve got two friends/family members back in Alaska who desperately need snow chains for their wheelchair tires, but can’t find anyone who makes them. Does anyone have suggestions?
Hey Randy,
Look us up at http://www.maxigripstore.com/, great alternative way to get winter tires with studs! And it looks better!
those look sick
😀
Nice Idea I will have to try this on my BMX. Lets see how difference it will make to it.
I tried these in the snow in Utah last winter and they worked great. http://www.bikepartsexpress.com/C484_0033/TR9381.html
you put the id in idiot. when one of those chains break off it may cause serious injury or death.
Judson, You are the Douche Bag in Douche Bag. haha
Slipnot Traction Systems makes a pretty burly low-profile chain. They come in sets for around $65. Made in Durango, CO too 😀
I made a set of these for my bike. $20. They work far better than $90 studs do. While you work OT to buy studs, I’ll be thinking of you on the trail while I’m riding! And you CAN make them for rim brakes too, just use your head and shorter chains. Good luck with rim brakes in the snow though! I have a rim brake bike but I use my disc brake bike in snow. If you don’t have a disc bike then wait till spring to ride or upgrade! That’s $180 front AND back for studs and I am poor so…Anyway,THE CHAINS ROCK. Try useing them before you judge them.
Great idea, I’ll try with my bike.
Thank you.
Wonderful web site. Plenty of useful info here. I’m sending it to a few buddies ans also sharing in delicious. And certainly, thank you on your sweat!
What happens if you get punctured?
you change the tube…
If you want to increase your experience just keep visiting
this web page and be updated with the latest information posted here.
Also visit my web blog … Facebook Credits Generator
[…] READ MORE HERE. […]